As a well - established Ball And Screw supplier, I understand that many customers may encounter situations where they need to replace a ball and screw. This process is crucial for maintaining the efficiency and functionality of various mechanical systems. In this blog, I'll guide you through the steps of replacing a ball and screw, ensuring that you can handle the task with confidence.
Understanding the Basics of Ball and Screw
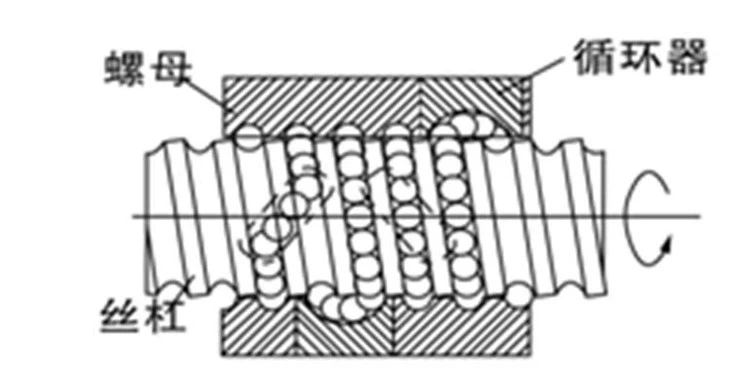
Before delving into the replacement process, it's essential to have a clear understanding of what a ball and screw is. A ball screw is a mechanical linear actuator that translates rotational motion into linear motion with high efficiency. It consists of a screw shaft, a nut, and a series of ball bearings. The ball bearings roll between the screw shaft and the nut, reducing friction and enabling smooth and precise movement.
There are different types of ball and screw systems, such as Linear Motion Screw. These are designed for specific applications where linear motion is required, like in CNC machines, robotics, and industrial automation.
Reasons for Replacement
There are several reasons why you might need to replace a ball and screw. Over time, wear and tear can occur due to continuous use. The ball bearings may become damaged or worn out, leading to increased friction, reduced efficiency, and even noise during operation. Another reason could be a change in the application requirements. For example, if you need to upgrade your machine to handle higher loads or achieve greater precision, replacing the ball and screw might be necessary.
Pre - replacement Preparations
Gather the Necessary Tools
To replace a ball and screw, you'll need a set of appropriate tools. These typically include a set of wrenches, screwdrivers, a torque wrench, a dial indicator for alignment, and a clean workbench. Having all the tools ready beforehand will make the replacement process smoother and more efficient.
Identify the Correct Replacement Part
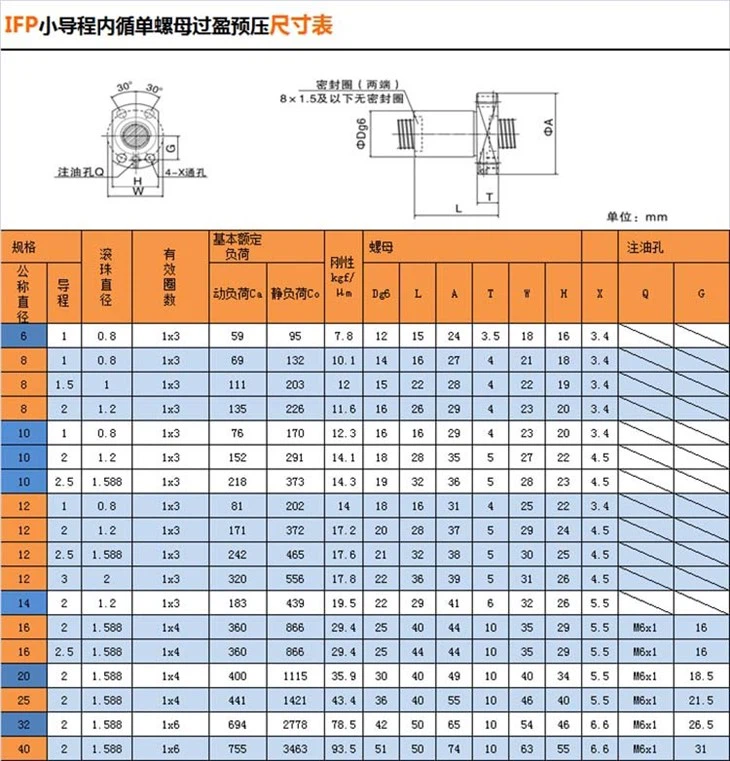
As a Ball And Screw supplier, I know that getting the right replacement part is crucial. You need to determine the specifications of your existing ball and screw, including the diameter, lead, length, and accuracy class. You can refer to the machine's manual or measure the components directly. If you're unsure, you can also find reliable Ball Screw Suppliers who can assist you in selecting the correct part. For smaller applications, Samll Ball Screw might be the right choice.
Safety First
Before starting the replacement process, ensure that the machine is powered off and locked out to prevent any accidental startup. Wear appropriate safety gear, such as gloves and safety glasses, to protect yourself from any potential hazards.
Step - by - Step Replacement Process
Step 1: Disassembly
The first step is to disassemble the machine to access the ball and screw. This may involve removing covers, brackets, and other components that are in the way. Use the appropriate tools to loosen the fasteners and carefully take apart the parts. Keep track of all the components and their positions, as you'll need to reassemble them correctly later.
Step 2: Remove the Old Ball and Screw
Once you have access to the ball and screw, carefully remove it from the machine. This may require disconnecting the nut from the load - bearing component and removing any retaining rings or clamps. Pay close attention to how the ball and screw is installed, as this will help you during the installation of the new one.
Step 3: Inspect the Mounting Surfaces
After removing the old ball and screw, inspect the mounting surfaces for any signs of damage or wear. Clean the surfaces thoroughly to remove any dirt, debris, or old lubricant. This will ensure a proper fit for the new ball and screw.
Step 4: Install the New Ball and Screw
Carefully install the new ball and screw into the machine. Make sure it is aligned correctly with the mounting surfaces. Use the torque wrench to tighten the fasteners to the specified torque values. Over - tightening or under - tightening can lead to problems later on, so it's important to follow the manufacturer's recommendations.
Step 5: Reassemble the Machine
Once the new ball and screw is installed, start reassembling the machine. Put back all the components that you removed during the disassembly process. Double - check that everything is properly aligned and tightened.
Step 6: Testing
After reassembling the machine, perform a thorough test. Power on the machine and run it through a few cycles to check for smooth operation. Listen for any unusual noises or vibrations, which could indicate a problem with the installation. Use a dial indicator to check the alignment and make any necessary adjustments.
Maintenance Tips After Replacement
After replacing the ball and screw, proper maintenance is essential to ensure its longevity and optimal performance. Regularly lubricate the ball and screw according to the manufacturer's recommendations. This will reduce friction and prevent premature wear. Also, keep the machine clean and free from dirt and debris. Inspect the ball and screw periodically for any signs of damage or wear.
Conclusion
Replacing a ball and screw may seem like a daunting task, but with the right knowledge, tools, and preparation, it can be accomplished successfully. As a Ball And Screw supplier, I'm committed to providing high - quality products and reliable support to our customers. If you're in need of a new ball and screw or have any questions about the replacement process, don't hesitate to reach out. We're here to assist you in finding the best solutions for your mechanical systems. Whether you're working on a small - scale project with a Samll Ball Screw or a large - scale industrial application with a Linear Motion Screw, we can offer the expertise and products you need. Contact us today to discuss your requirements and start a procurement journey with us.


References
- Machinery's Handbook, Industrial Press Inc.
- Ball Screw Design and Application Guide, various manufacturers' manuals.


