Replacing a worn-out trailer pin is a task that many trailer owners will eventually face. As a supplier of high-quality trailer pins, I've seen firsthand the importance of a properly functioning pin in ensuring the safety and reliability of your trailer. In this blog post, I'll guide you through the process of replacing a worn-out trailer pin, step by step.
Why Replace a Worn-Out Trailer Pin?
Before we dive into the replacement process, it's important to understand why replacing a worn-out trailer pin is so crucial. A trailer pin is a small but mighty component that connects your trailer to your towing vehicle. Over time, constant use, exposure to the elements, and general wear and tear can cause the pin to become damaged or worn. A worn-out pin may not hold the trailer securely, leading to a potentially dangerous situation on the road. It could cause the trailer to detach from the vehicle, resulting in property damage, injuries, or even fatalities.

Tools and Materials You'll Need
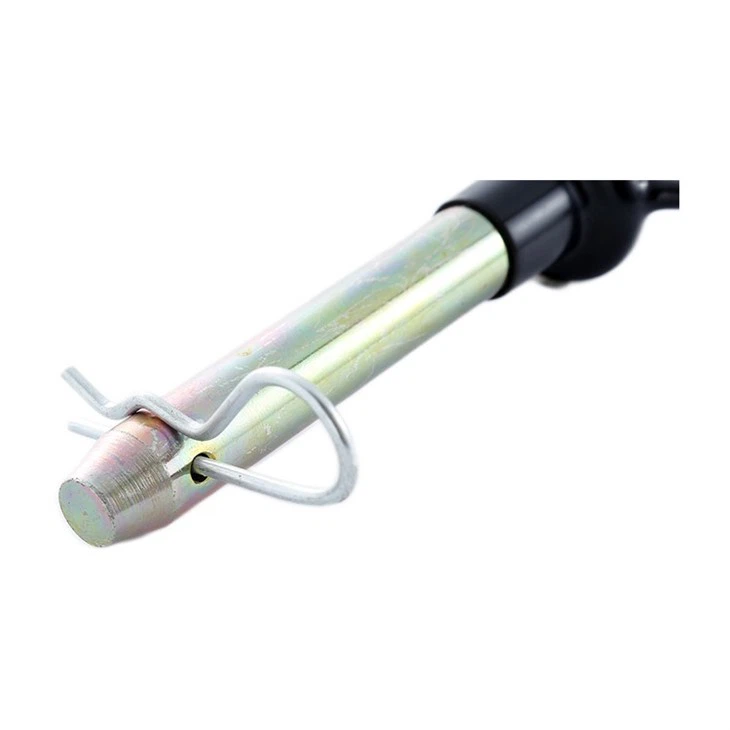
- New trailer pin: Make sure to choose a pin that is the right size and type for your trailer. As a trailer pin supplier, I recommend considering a Stainless Hitch Pin for its durability and resistance to corrosion.
- Wrench or socket set: You'll need this to remove the old pin.
- Safety glasses and gloves: To protect your eyes and hands during the process.
- Penetrating oil: If the old pin is stuck, a little penetrating oil can help loosen it.
Step 1: Prepare Your Workspace
Before you start working on replacing the trailer pin, it's important to prepare your workspace. Park your vehicle and trailer on a level surface and engage the parking brake. Make sure the trailer is stable and won't move during the replacement process. Put on your safety glasses and gloves to protect yourself from any potential hazards.
Step 2: Locate the Old Trailer Pin
The next step is to locate the old trailer pin. The pin is usually located at the connection point between the trailer hitch and the towing vehicle. It may be covered by a dust cap or a safety clip. Remove any covers or clips to expose the pin.
Step 3: Remove the Old Trailer Pin
Once you've located the old pin, use your wrench or socket set to loosen and remove it. If the pin is stuck, apply a little penetrating oil and let it sit for a few minutes to help loosen the rust or debris. Be careful not to force the pin out, as this could damage the hitch or the pin itself.
Step 4: Inspect the Hitch and Pin Hole
After removing the old pin, take a close look at the hitch and the pin hole. Check for any signs of damage, such as cracks, wear, or rust. If you notice any damage, it's important to address it before installing the new pin. You may need to replace the hitch or have it repaired by a professional.
Step 5: Install the New Trailer Pin
Once you've inspected the hitch and the pin hole and ensured they are in good condition, it's time to install the new trailer pin. Insert the new pin into the pin hole and make sure it fits snugly. Use your wrench or socket set to tighten the pin securely. Make sure the pin is tightened enough to prevent it from coming loose, but not so tight that it damages the hitch or the pin.
Step 6: Reattach the Safety Clip or Dust Cap
After installing the new pin, reattach the safety clip or dust cap to protect the pin from dirt, debris, and moisture. Make sure the clip or cap is securely in place.
Step 7: Test the Connection
Once you've installed the new pin and reattached the safety clip or dust cap, it's important to test the connection. Gently tug on the trailer to make sure it is securely attached to the towing vehicle. Check for any signs of movement or looseness. If you notice any issues, double-check the installation of the pin and make sure it is tightened properly.
Tips for Maintaining Your Trailer Pin
- Regularly inspect your trailer pin for signs of wear, damage, or corrosion. Replace the pin if you notice any issues.
- Keep your trailer pin clean and dry. Use a clean cloth to wipe off any dirt or debris after each use.
- Apply a thin layer of lubricant to the pin to prevent rust and corrosion.
- Store your trailer in a dry, covered area when not in use to protect the pin and other components from the elements.
Conclusion
Replacing a worn-out trailer pin is a relatively simple task that can be done with a few basic tools and some common sense. By following the steps outlined in this blog post, you can ensure that your trailer is safely and securely attached to your towing vehicle. As a trailer pin supplier, I understand the importance of using high-quality pins to ensure the safety and reliability of your trailer. If you have any questions or need help choosing the right trailer pin for your needs, please don't hesitate to contact me. I'm here to help you find the best solution for your trailer.
If you're in the market for a new trailer pin or other trailer components, I invite you to explore our wide range of products. We offer a variety of trailer pins, including the Stainless Hitch Pin, which is made from high-quality stainless steel and is designed to last. Our products are built to meet the highest standards of quality and safety, and we're committed to providing our customers with the best possible service. Contact us today to learn more about our products and how we can help you with your trailer needs.
References
- Trailer Towing Safety Guide, National Highway Traffic Safety Administration
- Trailer Maintenance Manual, various manufacturers